(Yes, I know VHS is Video Home System so VHS video tape is redundant, and also that they’re actually videocassettes.)
Long, long time ago, video came on tapes. Mainly VHS tapes. Unfortunately, VHS tapes degrade. My parents have several VHS tapes of our family, specifically the small VHS-C tapes used in camcorders. Something had to be done before they become unreadable.
I’m not the first person to want to do this. In fact, there’s many. For example, Linus Tech Tips “I Thought My Childhood was LOST”. The problem with these guides are they can get pretty hung up on quality. Always remember that something is better than nothing.
Naturally, Technology Connections “The Best Easy Way to Capture Analog Video (it’s a little weird)” has a simple approach, although on the Linus Tech Tips’ video he does comment
Thanks for the shoutout!
One thing I wish I could go back in time and change for my video was the capture thingy. I could never figure out how to get it to not cut the input audio level dramatically, so all my captures require a lot more work in the end than I’d like. But I was looking for something I could leave in a media center - if I were to remake that video I’d probably suggest a capture card and using OBS over the janky Amazon whatever I used!
Needless to say, this is a good approach without breaking the bank, and only requires four devices:
- a VCR
- an analog video to HDMI converter
- a HDMI capture device
- a computer
However, there’s a lot of details to go over.
VCR considerations
In every case, a VCR is required. I don’t know much about VCR quality, and supply is pretty limited. I.e. VCRs are expensive on eBay. Ask around if you can borrow one, or hit up second-hand shops or flea markets if you can.
My tip: if you can, get a VCR where the OSD (on-screen display) can be disabled.
Why is this important? Well, most VCRs overlay information on the video output. For example, symbols to let you know the tape is playing, or tracking information. For long VHS tapes or VHS tapes with an intro, this is less of a problem. But it’s especially important for VHS-C tapes, as often the camcorder begin recording immediately. For capturing video, being able to get clean video out of the VCR is great. If not, don’t worry - anything is better than nothing.
Video/HDMI capture hardware
The basic premise of Technology Connections’ solution is to convert the analog video signal outputted by the VCR to HDMI, and then capture the HDMI using an HDMI USB capture card (or a PCIe capture card if you already have one). The recording is done using OBS Studio (Open Broadcaster Software), as it is often vastly superior to the software supplied with capture cards (if any).
The good news is that HDMI USB capture cards are now readily available. They are often used for streaming game consoles or capturing video from nice cameras that significantly outperform even expensive webcams (like DSLR cameras). You can get extremely cheap HDMI USB capture cards for $20 USB or less. These are… fine. They are USB 2.0, and so have resolution and framerate restrictions that simply don’t matter for VHS capture. But worse, they compress the video stream using MJPEG. This compression is absolutely noticeable, especially on low resolution video.
Note from 2026: I’d no longer recommend the Cam Link 4K. Magewell capture cards are better, since they show the input format.
If you can bear the cost, Elgato’s Cam Link 4K capture device is a great device. On sale, it can be had for around $100 USD, or used for $90 USD or less. It is absolutely worth the price, as - as far as I can tell - no compression is applied.
There is another, more deluxe option. Some capture cards have HDMI pass-through. If you choose this option, you can also review the footage on a TV, or even watch it while capturing. Since you will be capturing the video in real-time, this can be a nice option to do with parents or family.
PAL to HDMI hardware
Note: Many/all? of the capture solutions stretch video from 4:3 to 16:9. This can easily be fixed by the capture/recording software, with basically no quality loss.
The basic RCA to HDMI converter of Technology Connections’ solution is fine for NTSC video. There are many, many of them available. They’re all pretty similar, although some have the switch and USB power port on the HDMI output side. And although many of the converters look the same, they sometimes use different chips internally. I’ll be exploring this in a future article. This is an example RCA/AV to HDMI converter I acquired:
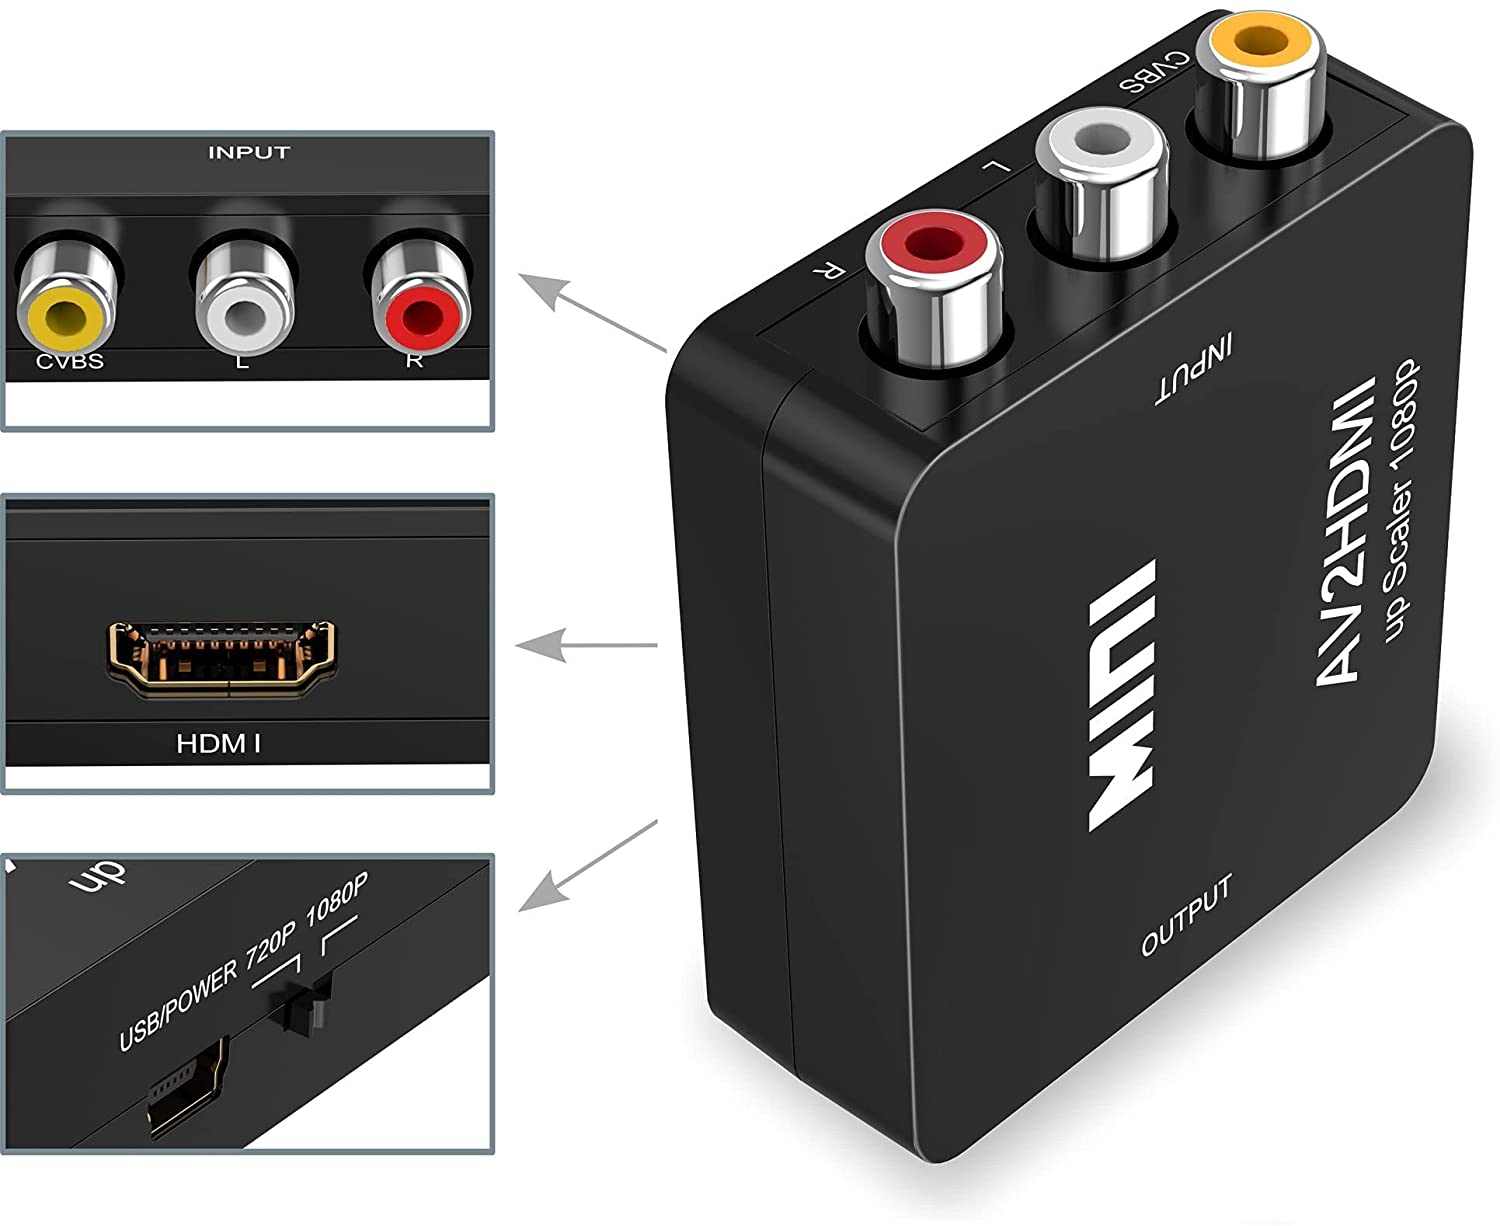
As can be seen from the image, the only setting is whether the converter upscales the image to 720p or 1080p.
And it works great for NTSC video. Does this converter handle PAL? Yes and no. The product description says it does support PAL, and this isn’t wrong. It decodes PAL video fine. However, all of these converters can only output at 60Hz. And to be fair, this is clearly mentioned in the product description. This means that internally the video is converted from 50Hz to 60Hz. Not ideal.
The other downside is that most PAL VCRs have SCART sockets. And while SCART also transmits composite video signals like RCA, potentially it also supports RGB, S-Video, and YPbPr signals if the VCR also supports these. Ideally, I wanted to make use of at least S-Video. I’m not sure if I actually accomplished this, but this did lead me to search for SCART to HDMI converters.
Of course, SCART to HDMI converters exists. Most of them still only have a 720p or 1080p toggle, and are therefore basically no better than the RCA version. They use the same chips as the RCA to HDMI converters, and only hook up the composite lines of the SCART socket.
Luckily, I did find a device from a manufacturer named “Mcbazel”, the “Scart Hdmi to Hdmi Video Converter Box”:
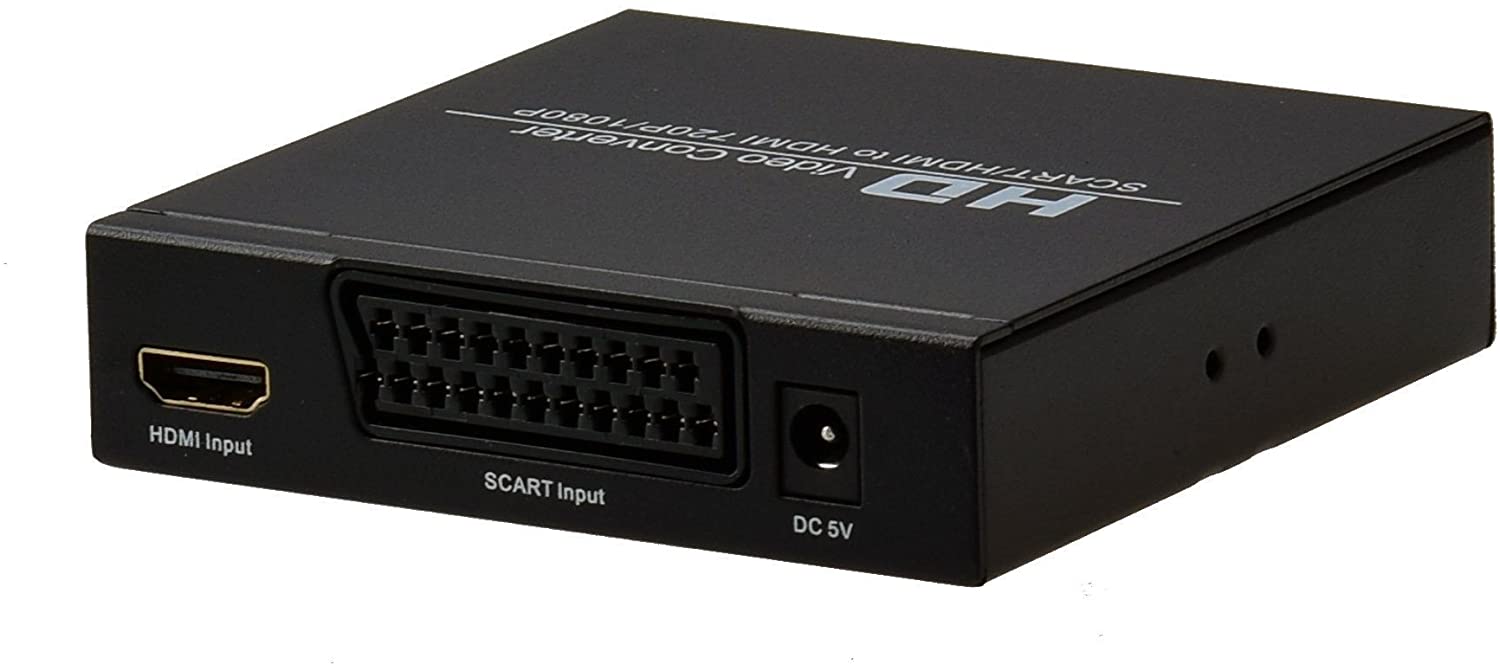
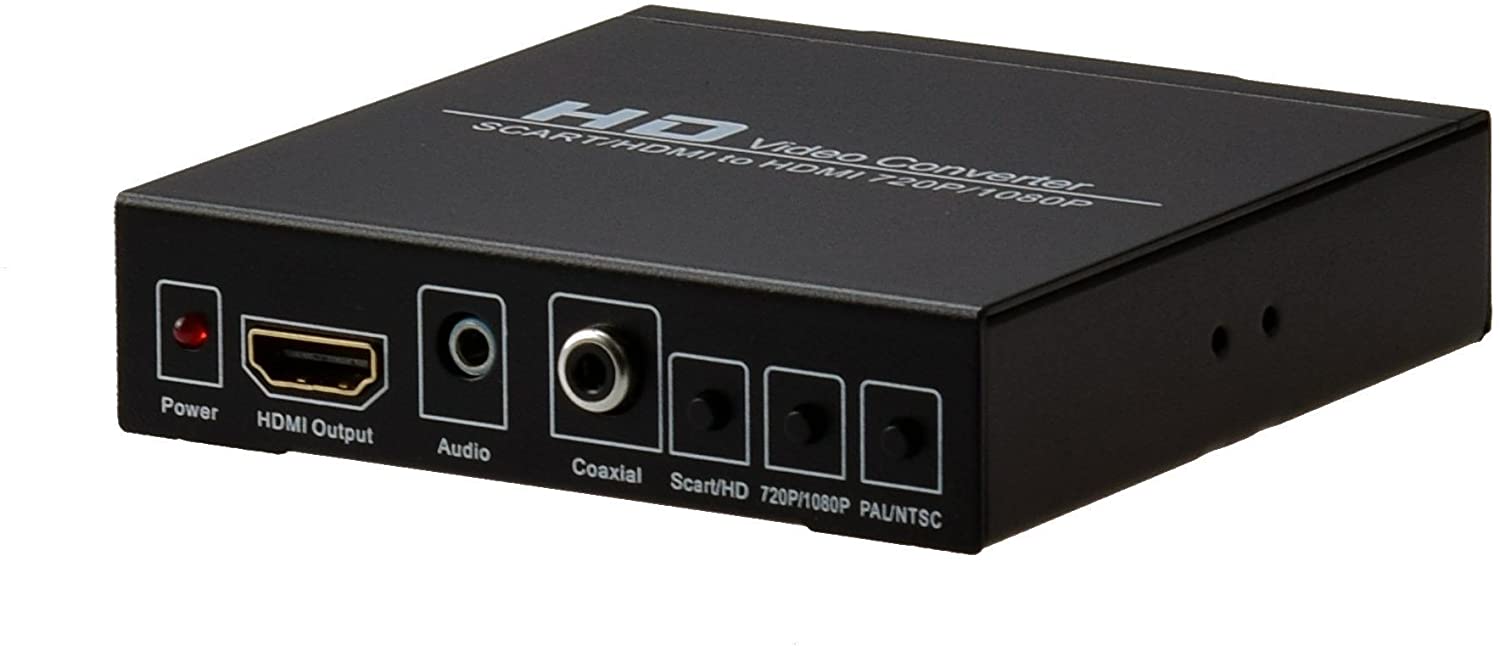
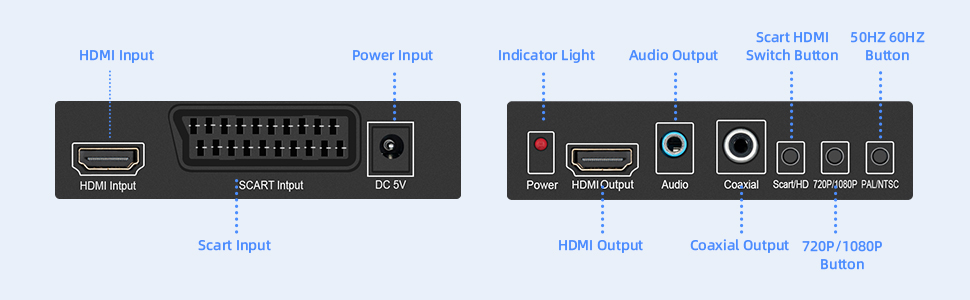
Crucially, note the PAL/NTSC switch. I bought this device for around $30 USD, and for that price, it is an absolute steal. It’s much, much more complex internally than any other cheap converter I have. I highly recommend this device, so much so that I will include Amazon links here: Mcbazel Scart Hdmi to Hdmi Video Converter Box (Amazon US) and Mcbazel SCART + HDMI to HDMI converter (Amazon DE) (these are not affiliate links). At the time of writing, these were $30 USD (excluding tax) and €31 EUR (including tax) respectively.
Note that the DC 5V input is a 5.5 mm (outer) x 2.1 mm (inner) barrel plug (aka. coaxial power connector, barrel connector, concentric barrel connector, tip connector). The inner connection is positive, and the outer connection is negative, as is common. The length of the connector on the power supply is about 11 mm, however a length of 10 mm also works. This means you can buy a USB to barrel plug should you want to use a quality power supply, instead of the included one of dubious quality (it isn’t UL listed).
FireWire/IEEE 1394/DV converter hardware
There exist DV FireWire converters:
- Canopus ADVC-100 / ADVC-110 / ADVC-300 (NTSC and PAL?)
- Sony DVMC-DA2 (NTSC only?)
The upside of all these is that they have S-Video in, and do the analog-to-digital conversion. The downside is that DV has compression applied. This is a big problem, as there is no way to bypass or undo this. But just how bad is this solution?
The other big problem is that no modern computers have FireWire/IEEE 1394. For example, on a new Mac, you’ll need:
- A FireWire 400 4-conductor to FireWire 800 9-conductor cable (~$15 USD)
- Apple Thunderbolt to FireWire Adapter ($29 USD)
- Thunderbolt 3 (USB-C) to Thunderbolt 2 Adapter ($49 USD)
That’s $93 USD (without tax)! But it works. And it also works for Windows laptops with Thunderbolt 3. For Windows desktops, there also exist FireWire PCIe cards, for ~$45 USD. It might work? That’s still ~$60 USD. So anywhere from $60 - $100 USD (without tax) just for the connections, and then likely $100+ USD (without tax) for the converter itself.
To me, DV doesn’t make sense at all, unless you also need to transfer video from a DV camcorder. Then, you may want to invest in the cables to avoid re-encoding the video (as a DV transfer is lossless, except for the already applied compression). Otherwise, any workflow using HDMI to USB makes more sense.
Video capture software
The recording is done using OBS Studio (Open Broadcaster Software), as it is often vastly superior to the software supplied with capture cards (if any).
As noted above, the capture solutions stretch video from 4:3 to 16:9. This can easily be fixed in OBS Studio.
I captured my footage in 720p. This is 1280x720 pixels for the 16:9 HDMI signal. 720p is more than the analog resolution of both NTSC (480i) and PAL (576i). In principle, there is no point capturing at a higher detail than the original video. In practice, if your AV to HDMI converter already converts to 720p, you might as well use this signal. Also, it’s much nicer to view the 720p video afterwards.
Since I was recording PAL, I set the video FPS to 50Hz. From my testing, this is actually necessary. PAL’s framerate is nominally 25Hz for progressive video, but VHS tapes will be interlaced, with half a frame at 50Hz. The AV to HDMI converter already does okay deinterlacing, and spits out a 50Hz or 60Hz signal. So, to capture all of the data, record at that framerate. The file size difference between 25Hz and 50Hz was pretty small.
In OBS, I set both the base (canvas) resolution and the output (scaled) resolution to 960x720 pixels. This restores the 4:3 aspect ratio (1280 * (9/16) * (4/3) = 960). I then resized the input video source to fill the canvas.
For the recording, I used x264 with a reasonable quality (I forget the exact settings).
Finally, OBS has a very nice feature called “Output Timer” (in the “Tools” menu). If you aren’t watching the video as it is being recorded, it’s possible to forget to stop it. The output timer can be set for half an hour longer than the tape, to give a buffer, but avoids recording hours of blank screen. Removing the blank video at the end is a pretty trivial editing option.