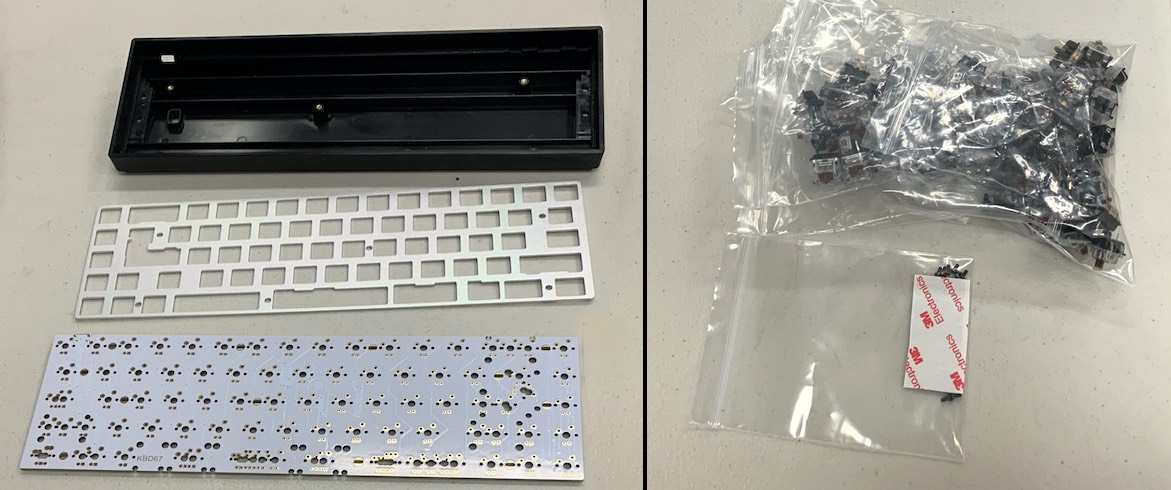
Parts list
Most parts were sourced from the excellent KDBfans. There was a slight disruption due to the Coronavirus/COVID-19, but I was more than happy to wait, and once that cleared up, they shipped it very quickly. I have added links, and highly recommend them.
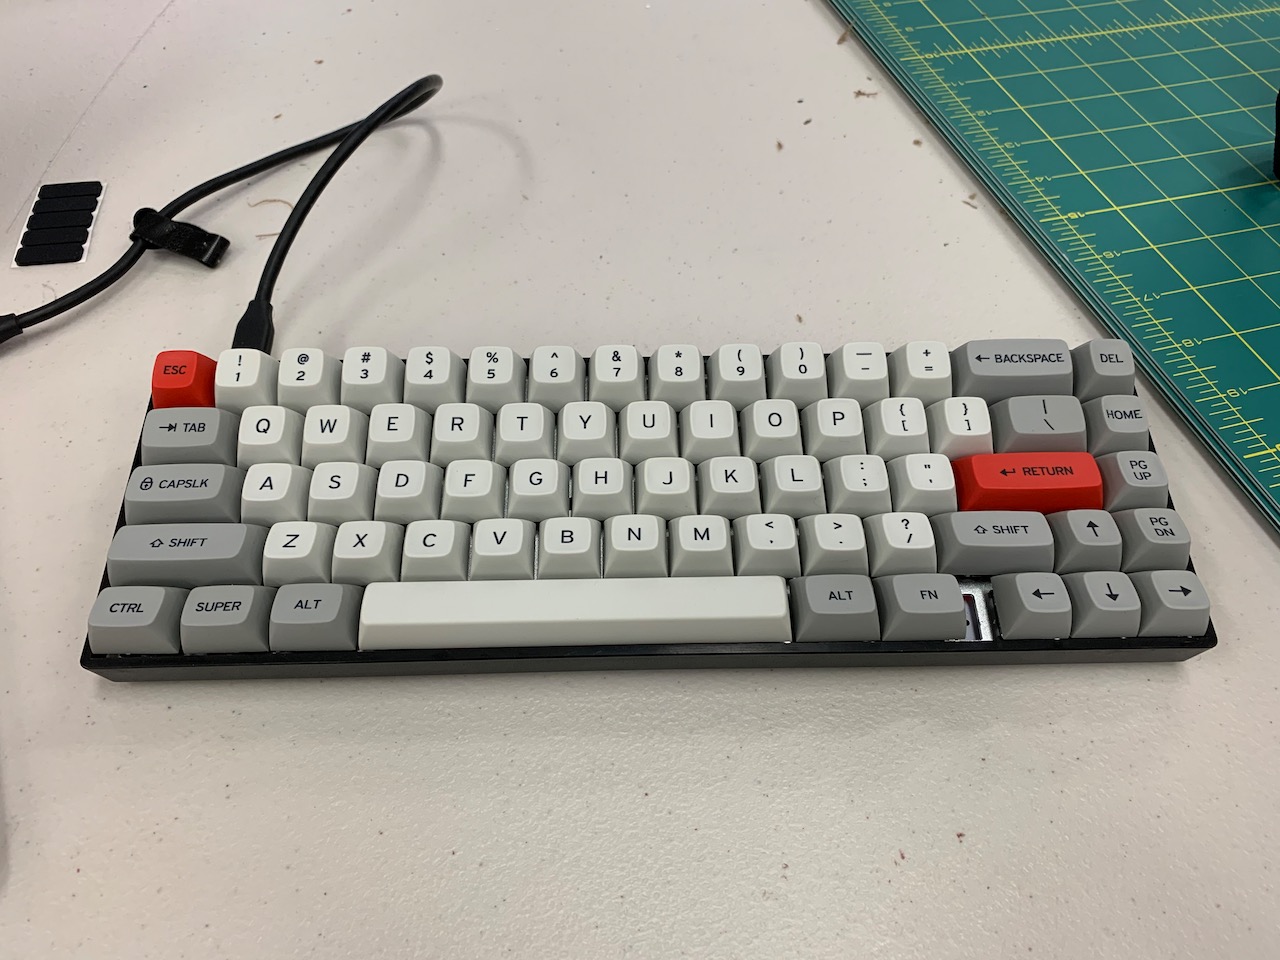
Keycaps
Matt3o MT3 /dev/tty keycaps from Drop (formerly Massdrop, login required)
Let’s start with the keycaps, while functionality is the most important part of a mechanical keyboard, there’s not too much mystery around good switches and other components. The keycaps do play a large role in functionality, too, as they often dictate which layout the keyboard can have. I wanted a 65% layout, without function keys (F1-F12), but with an arrow cluster.
I love almost everything about these! The colours, the font, and the shape are amazing. The downside (a big one) is they use the relatively obscure Whitefox Aria layout, with a gap between the right system keys and the arrow cluster. The only other option I could reliably find was the expensive, fully assembled Drop keyboard with RGB, which I didn’t want. So far, I do enjoy this layout though, so it was worth it.
I also wish there were some alternative keycap options; I’d like to replace caps-lock with control, and escape with back-tick/tilde. Oh well. Seems like the new /dev/tty2 caps will offer some alts.
(You might also want a keycap puller on hand, it’s a good idea.)
Switches
Next most important are the switches, because they’ll impact the feel the most. Previously, I’ve had Cherry MX switches. They’re great, and wide-spread, so compatibility with other components is good, unlike Topre switches. However, there is another option now: Gateron. At first, they seem like direct Cherry ripoffs, but they do have a different feel - so it isn’t quite so easy.
I used to run Cherry MX blues, but the clickiness can be an issue in the office. And to be honest, I don’t like the noise they make at home, either. So blues and greens are out. The next obvious choice were Cherry MX browns, for me, they don’t have enough of a tactile bump. So, for a long time, I thought Cherry MX clears would be ideal. Non-clicky like browns, with stiffer actuation (i.e. more force to press, so more tactile). But it’s almost impossible to find a non-DIY option with these at a reasonable price point.
With the Gaterons in town, there’s new options. I got this tester (Amazon link). Immediately, I quite liked the Gateron browns. They’re stiffer than Cherry MX browns, not as stiff as Cherry MX clears, and tactile enough for me. This is good, since less force than the clears should mean not as tired fingers. Bonus: they’re also cheaper; although not by much. And just to be clear, I would’ve been more than happy to pay for Cherry MX - skimping on switches doesn’t seem wise.
I also liked the Zealio 65g the most. But are they $50+ better? It’s so hard to tell from a tester how a full keyboard will feel. So Gateron brown it is. I got the 68 batch, plus 10 extras (just in case - I didn’t need them though).
PCB (printed circuit board)
It took way too much time to find a PCB that I could reasonably confirm supports that rare Whitefox Aria layout. The KBD67 seemed to (luckily, it did). As a bonus, it also has USB-C, which I much prefer over micro-USB - easier with Macbooks and future-proof. The QMK firmware turned out to be a huge feature, too, and I’d recommend looking for PCBs with QMK support.
Case
I got this plastic case, because I wasn’t sure if it would fit the the PCB (the KBDfans’ website now confirms it does). I’ll probably go for a higher-quality case in future, but for now, it works fine, and for 10 bucks, I can hardly complain. The case can also be fairly easily swapped, unlike all the other components.
Plate
The plate is listed after the case, since the case might dictate a certain plate. Plates are also one of those components with a lot of, erm, subtle choices around them. Is a brass plate better than aluminium? Well, you’d have to build two keyboards. From what I hear, aluminium is fine, and 65% keyboards don’t need quite the same rigidity as a full-size one.
Stabilisers
Big keys still only use one switch; stabilisers stop them from rocking or tilting to one side when you press them unevenly. They are absolutely required. I had no idea if these would work or fit the PCB, but they do perfectly! Yay. The screw-in ones seem like a good idea over the clip-in ones. I’m not sure if it really matters, but the price difference is negligible.
Build
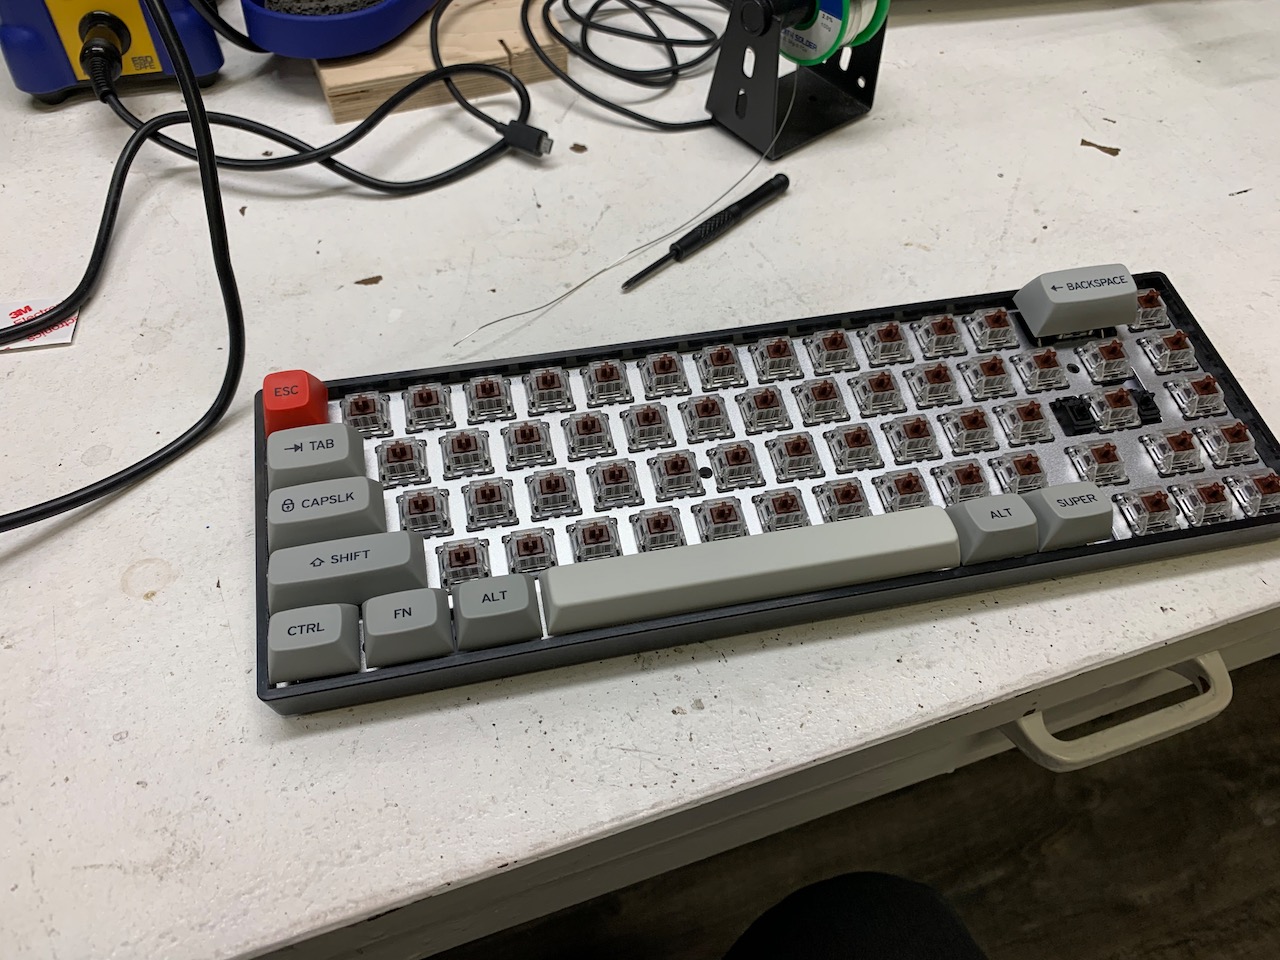
Building the keyboard turned out to be easier than expected! Really, it’s just quite a bit of soldering, although for a beginner or with an awful soldering iron I can see this being a bit of an issue. Gather all the parts (keycap set not pictured):
Check if the PCB works
I don’t know if this is strictly necessary; but it can’t hurt. Connect the PCB to a computer, and bring up an online key press tester (QMK). Now, using conductive tweezers, probes, or jamming a switch in at an angle so it makes good contact, test all the positions.
Installing the stabilisers
The first step, believe it or not, is installing the stabilisers. This is because the next step will make accessing the holes for the stabilisers almost impossible. Stabilisers are weird; it wasn’t obvious to me how they go together. Luckily, I found an incredibly helpful and detailed guide, which I followed, and I recommend you do, too - at least for the stabilisers!
You may need the keycaps for this already, to get a feeling for where the stabilisers need to be for certain keys. The PCB supports several layouts, and so has many holes for different layouts. Keep this in mind for the next step, too. You can always refer back to the keycaps to check. Double check all the positions before proceeding, much easier to fix it now.
Plate and PCB assembly
In my experience, this is the most crucial part of the build. Basically, if the switches aren’t flush against the plate and PCB, they won’t be in alignment, and when you put the caps on, even a small issue will noticeably tilt them. The caps may even rub together! Take your time to get this right.
Also, some switch positions will depend on your layout. I recommend the following approach:
- Pick some keys you definitely know the location of, both on the outside and inside. Escape (top-left) is an obvious choice, G or H (middle), in my case delete (top-right) and the right arrow (bottom-right) also worked.
- Put the switches for these keys into the plate. Make sure they’re all the way in, properly seated
- Now, with the switches in the plate, wrangle the leads into the holes in the PCB
- Ideally, clamp the plate and PCB
- You might want to add more switches at this point
- Start soldering, making sure to leave clean solder joints
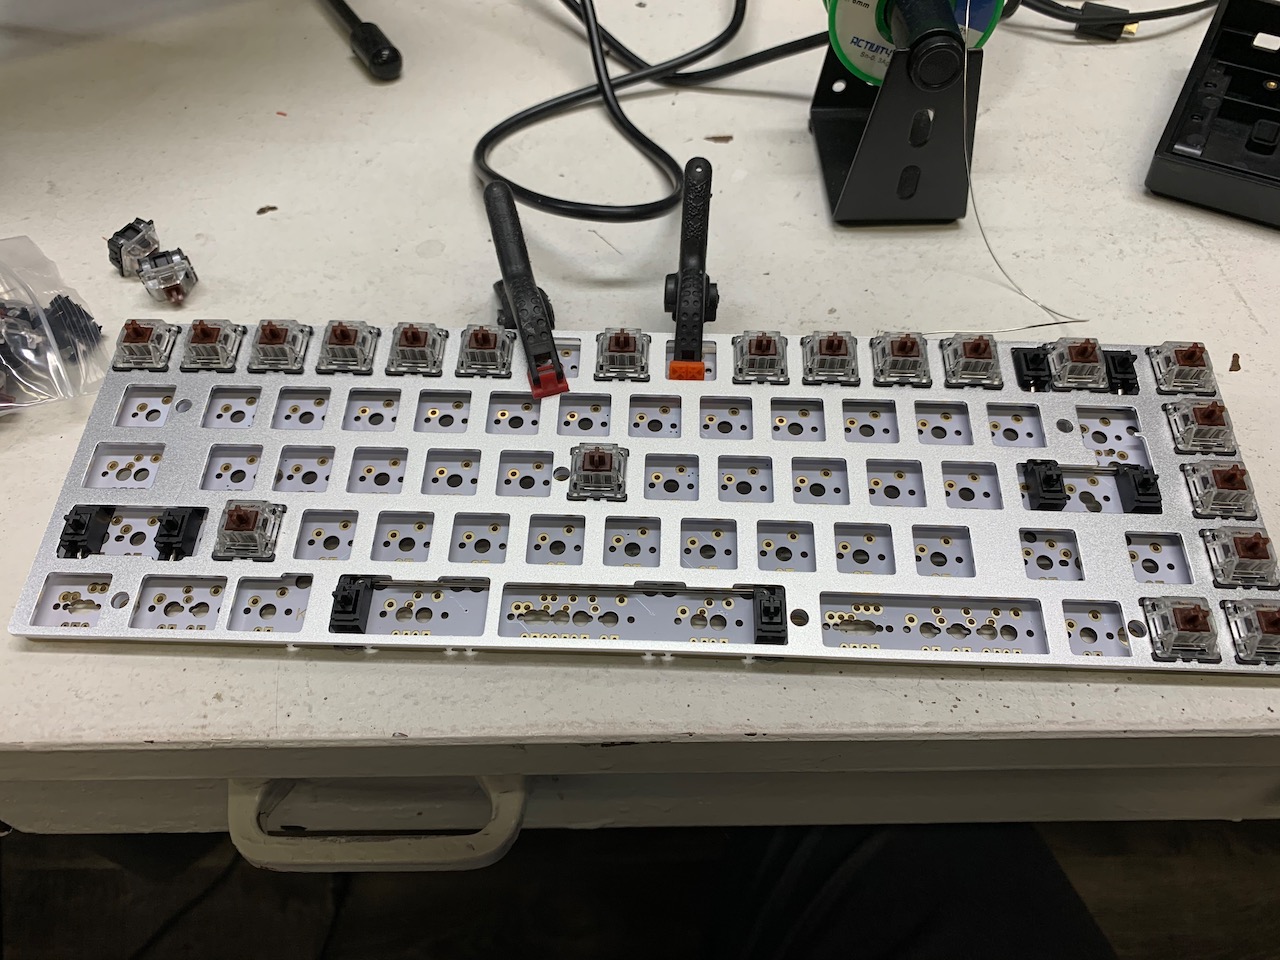
Go slowly. Make sure each switch you add is properly seated. It’s much easier to double-check, than to have to fix it later (desoldering/warming up two leads is a pain). Any pattern here should work; going row-by-row probably isn’t a good idea. It’s fine to leave the switches for the bigger keys - and therefore more tricky - until last. You may have to get out the keycaps again and check, although it’s often obvious from the stabiliser positions.
Eventually, you’ll get all switches soldered. Patience is really key here, and the time you put in pays off.
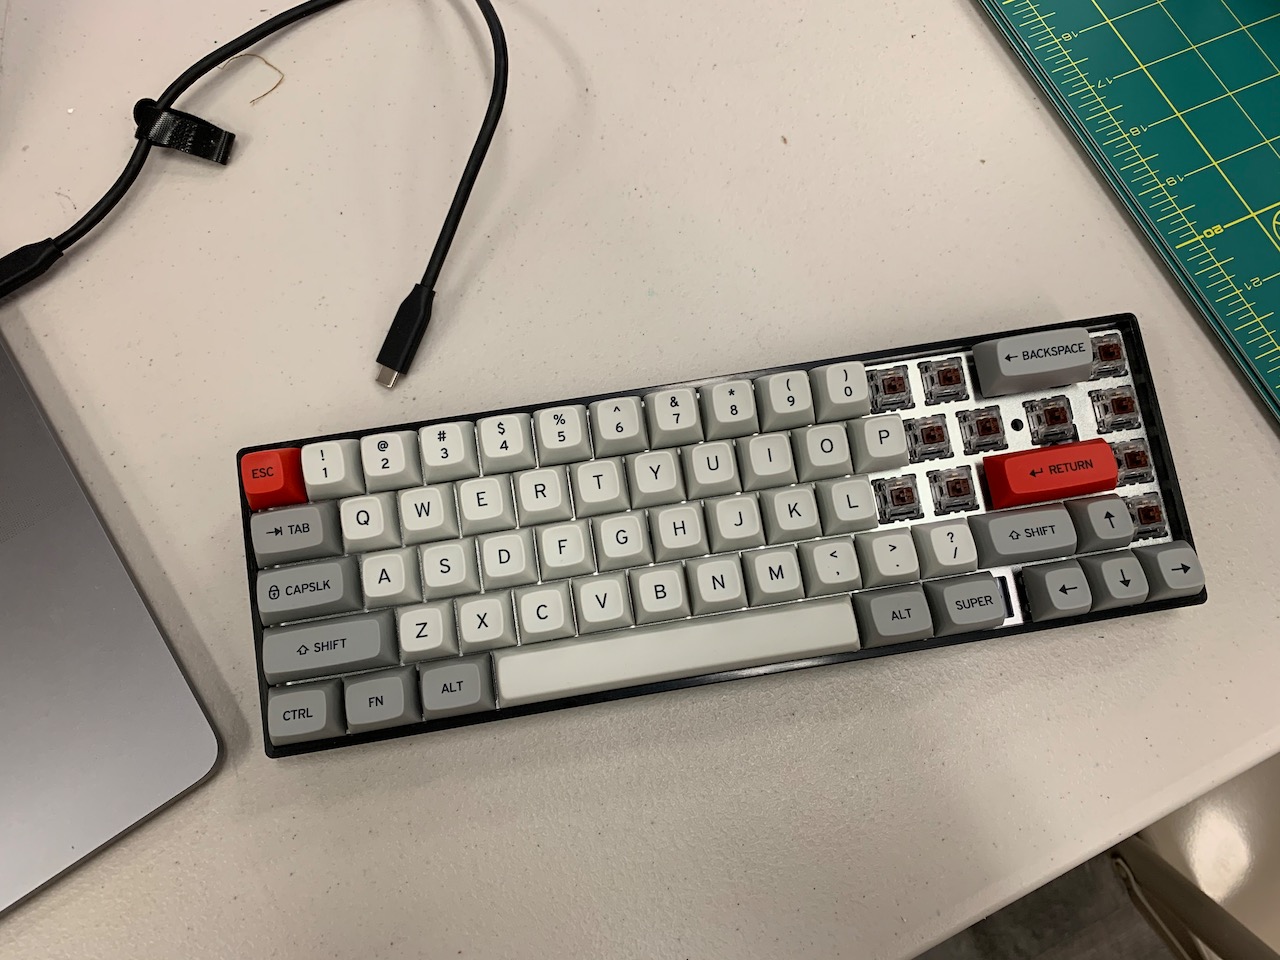
You can fit the PCB/plate/switch combo into the case or not, but you’ll want to connect it to a computer to check the connections.
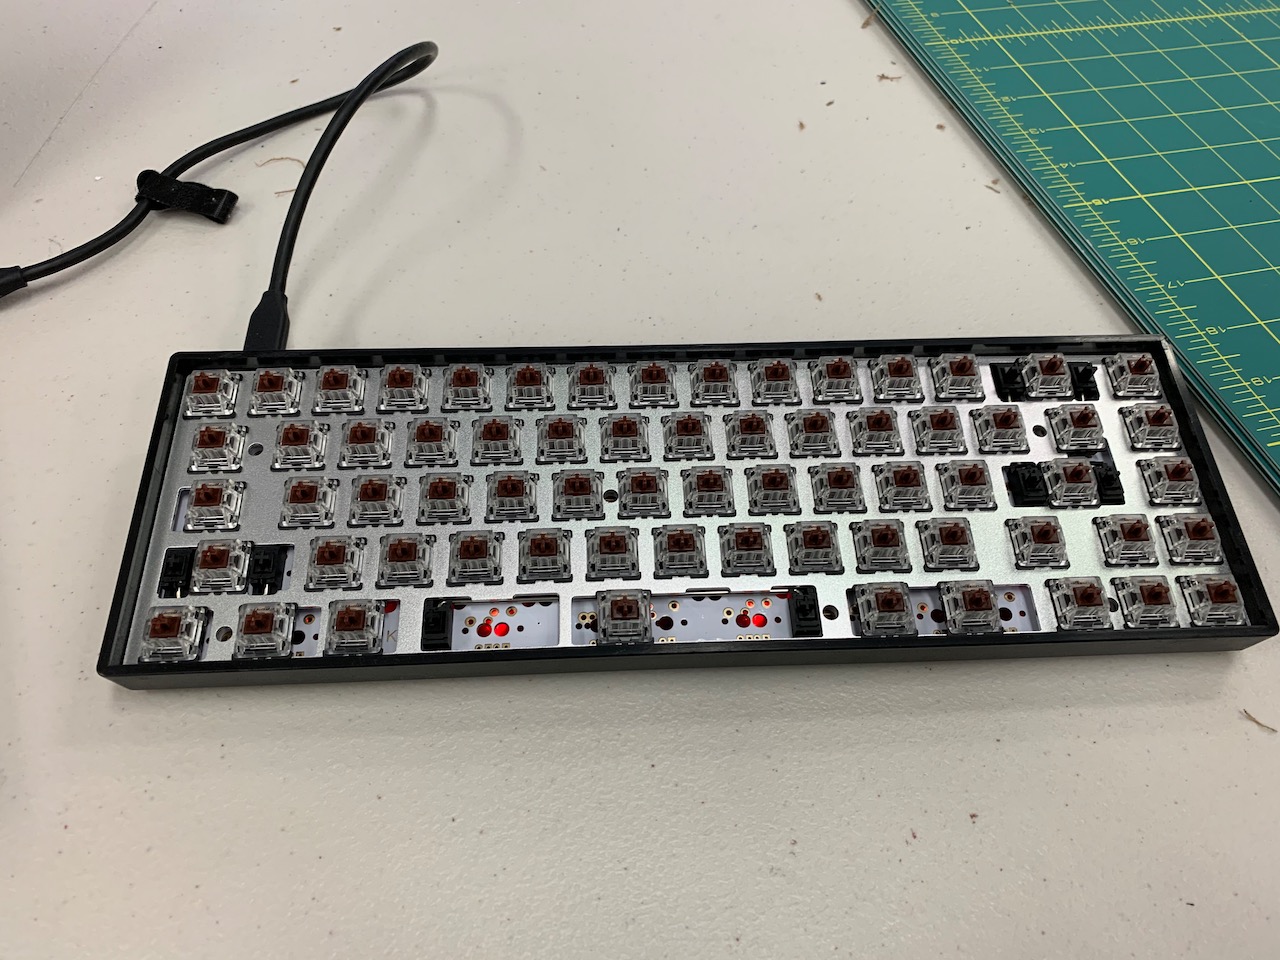
Use an online key press tester (QMK), the same one if you checked the PCB earlier. Check all the switches work by pressing them one by one, and seeing the corresponding presses being registered reliably. Most keys should map directly, but don’t worry if some don’t - this may depend on your layout, and can be remapped later. For example, with my layout, the delete and home keys weren’t quite mapped correctly with the factory firmware. But the large majority (especially letters) should.
If something seems wrong, now is the time to check it out. Key presses not registering is usually a bad solder joint, but could be a duff switch, too. Unexpected presses are worse, you may have a solder bridge somewhere (something connecting where it shouldn’t be), or, worst case, you knocked a diode off somewhere. But if you’re careful, this is unlikely to happen.
Before moving on, you might want to wipe down the PCB with isopropyl alcohol. The flux from solder is slightly corrosive, and while it’s usually fine, wiping down everything is a good precaution.
Alright, the hard part is over! Almost out of the woods now. Phew.
Screwing the PCB to the case
At this point, I’d screw down the PCB, as once the keycaps are installed, there’s no access to the screw holes any more.
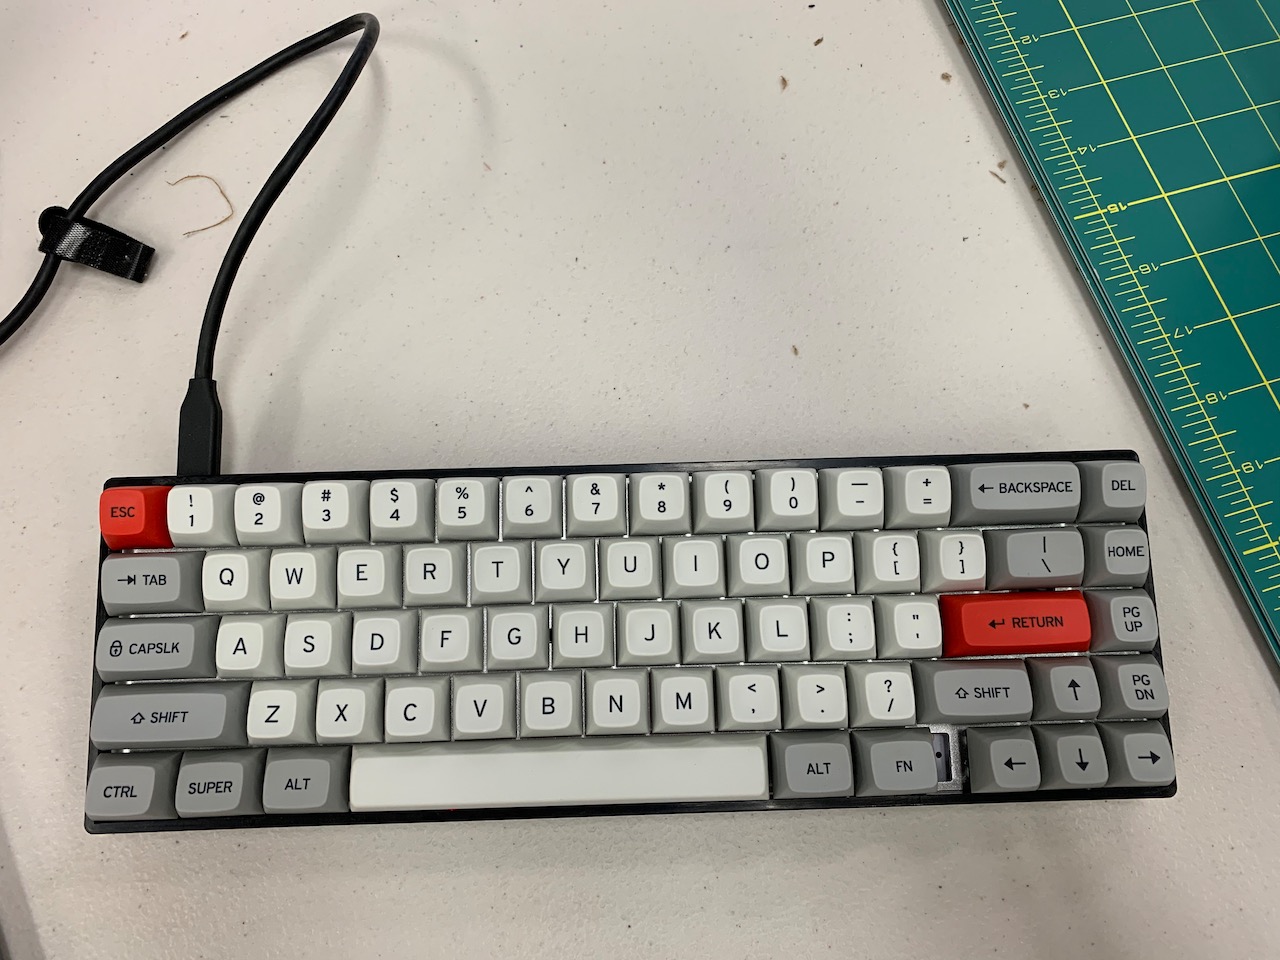
Installing the keycaps
Being putting the keycaps on. It isn’t a bad idea to start with the bigger keys - the ones with stabilisers - since they have three pegs (one for the switch, two for the stabiliser posts). Try and put them on orthogonally/from the top so as not to tweak the switches. The caps have a bit of a friction fit with the posts, so they don’t fall off, but be as gentile as you can.
This is my favourite part, and it usually goes quite quickly.
Firmware, remapping keys
At this point, the keyboard is largely functional. But I needed to remap some
keys due to the layout. I also ended up remapping some other keys, including the
left super/alt (for macOS use), as well as caps-lock to left control, and escape
to back-tick/tilde (so fn + back-tick = escape). This is all very easy to do
with the QMK (quantum mechanical keyboard) firmware.
They have an online configurator tool that’s
unbelievably easy to use. After selecting the appropriate keyboard
(kbdfans/kdb67/rev2) and layout (LAYOUT_65_ansi), I could simply drag and
drop the keys I wanted onto the visual keyboard representation from the palette
below:

There’s a bit of subtlety with the function key (FN) and layers. QMK supports several layers, but unless you’re an advanced user, you may want to stick to two for simplicity. In this case, the first/default layer (0) is usually active, and the FN key simply shifts to the second layer (1). In QMK, this is called MO, or “momentary turn on layer”.
This doesn’t need to be overthought, as you can easily change this again later.
You want to download the keymap.json for future reference. Then, click
“compile”. This will actually build the firmware online (although this can be
done locally, too, if you’re more technically inlined). This takes a while, but
once it’s done, you can download it via the “download firmware” button.
Next, download a release of QMK toolbox. This is used to flash the firmware onto the keyboard’s micro-controller.
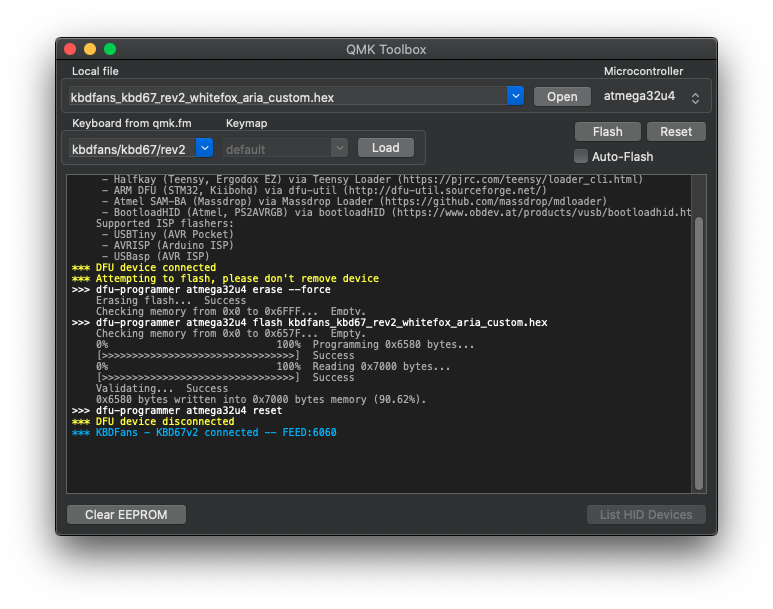
It works like this: Click the “open” button, and load the firmware compiled by QMK configurator. There’s no need to select the keyboard in the drop-down below. Don’t click the “load” button, either. This simply downloads the default, pre-compiled firmware from QMK. Next, I had to set my keyboard into flash mode. I did this via the button on the bottom of the PCB; my case has a small cutout to allow access. There’s also a key combination to do this, but I can never remember it. It should say “DFU device connected”. Now, simply click the “flash” button, and the firmware is flashed. After this, it should say “DFU device disconnected”, and the keyboard should re-appear.
It’s that easy! QMK is great. It’s probably a good idea to test the firmware was successfully flashed and the mapping is as expected using the keyboard tester page again.
And that’s it. How I build my DIY mechanical keyboard, how easy it was, and how you can, too (assuming you can order online and solder). Good luck!