Two years ago I build a fightstick, i.e. a gamepad with an old-school joystick and lovely, beefy push-buttons. This is the updated, heavily edited build log from a previous blog.
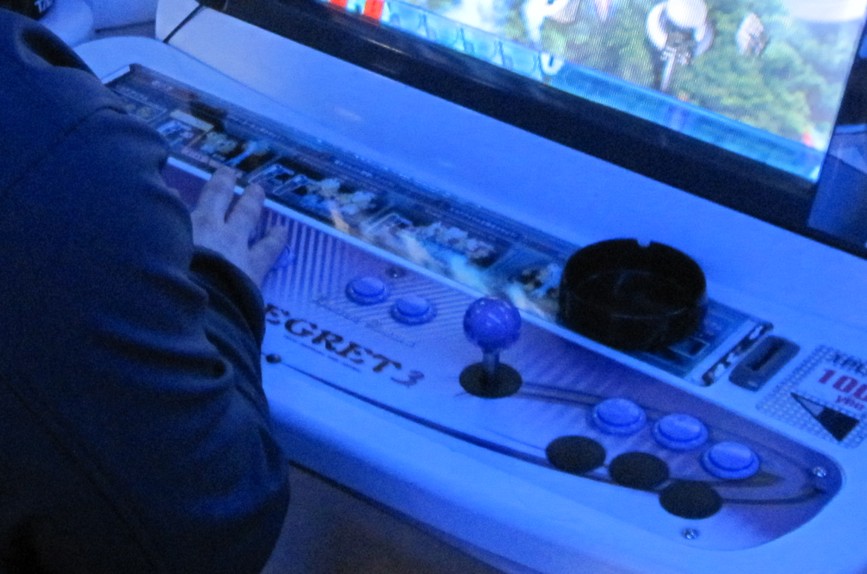
I’ve always loved arcade games, and this year I traveled to Japan, where Sega or Taito arcades are everywhere, especially in Akihabara. After playing and seeing other people play, I knew I needed to make a gamepad when I got back, to play classics like Metal Slug and other shoot ’em ups (shmup) the way they were intended to. So I did.
Update: If you don’t get the fascination with arcades, 100 Yen: The Japanese Arcade Experience is a very enjoyable film that sheds light on arcade culture, which is mostly lost outside of Japan. Although lately, thanks to games like Dark Souls and geeks around the world, it’s possible to experience something similar outside a smokey, Japanese arcade.
The experience I’m trying to replicate, sans ashtray:
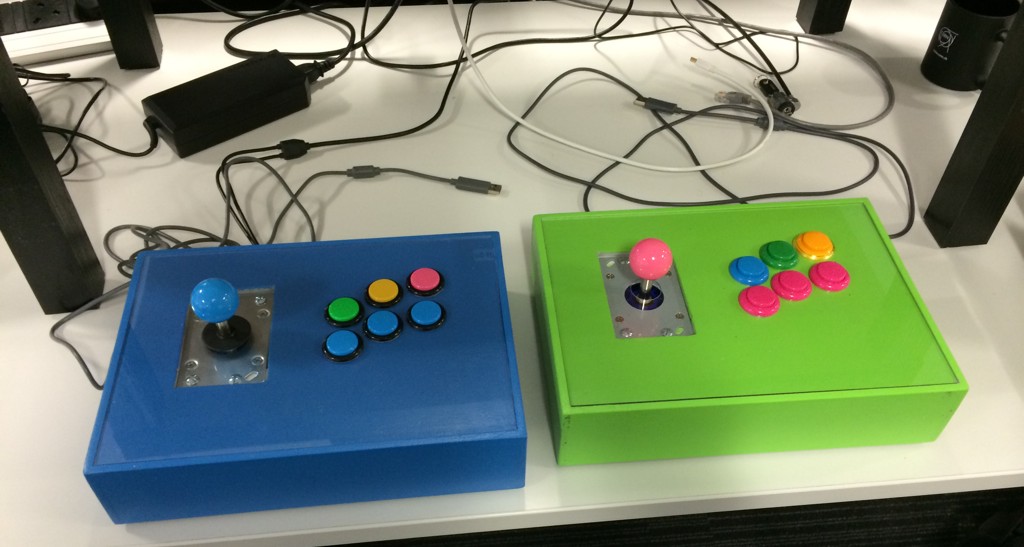
The first thing I found out was that the one-person versions are called fightsticks, and that people playing fighting games still use them. Even better, you can order the same joysticks and buttons used in the Japanese arcades in almost every country in the world. If anything, there’s too much choice! Which one is right? If you haven’t tried them, you’ll never know, despite the guides online it’s an inherently personal choice. I went for a Seimitsu LS 32 joystick, which is a traditionally Japanese arcade joystick in that it has 4 momentary switches for the directions (similar to a D-Pad) and a traditionally short shaft with a ball top. It’s a good all-rounder in my opinion, and unlike some stiffer options works well for shmups. I also got six beefy, but sensitive Seimitsu PS 14 GN 30mm buttons, in various colours, all from Arcade World UK.
All the components are more expensive than you might think, and at 3x the price of generic hardware, it’s tempting to get the generics. But if you’re building your own fightstick, this really defeats the point, and it is noticeable even to novices. It also puts into perspective how seriously and correctly Japanese arcades take gaming - refreshing compared to Europe.
Next step: Hit the hackspace.

In general, I recommend heading to the hackspace before buying anything and asking around. Something I did not do when I acquired the wood for the fightstick cabinets, and I regretted a bit. The wood I used was 8mm plywood and some nondescript 1x2 or 1x3 beams of wood, plus some A4 Lexan for the top-plate. I don’t have very many pictures of the cabinet-making process, but it was pretty bad. I’ve never used a router, so it never occurred to me to use one. Instead, my 3-layer sandwich of ply with different patterns worked quite well. This is required because the buttons don’t fit over too much material.
Though sturdy, which is what you want for a fightstick, in hindsight, the plywood and beams are way too thick. As a result these things way a tonne. I’d definitely do this differently in the future, although I do like wood as a material.
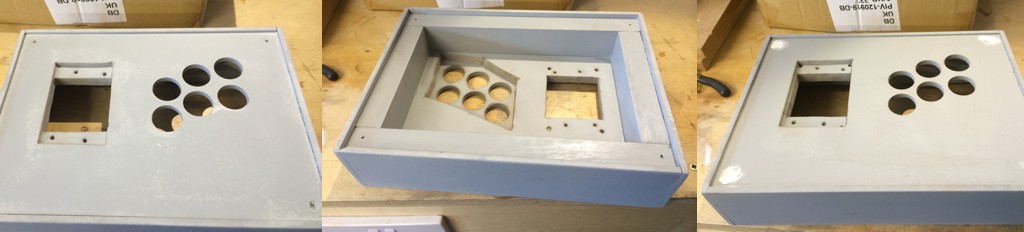
There was plenty of sanding, priming, sanding and filling. It really does make a difference on the finish, and while there is such a thing as too much prep, most people don’t get there.
The cabinets also have a bottom, I glued magnets into the four corners of the cabinet and bottom, so it’s easily removable without any nasty hinges or screws (e.g. when it goes wrong during play). This works really well.
Painting was a bit of a pain. Paintbrushes are utter garbage, don’t even bother. I don’t know how people get high-quality finishes with paintbrushes. Spray paint is better, but I wanted vibrant colours to match the colours of the joystick heads and buttons, so I got two wall paint testers at the local hardware mega-store. After throwing away the brushes, I used foam-rollers, which worked better but couldn’t undo some of the deep groves that thick paint plus brush produces. Should have gone back and sanded. Anyway, the result with matt varnish is pretty nice:
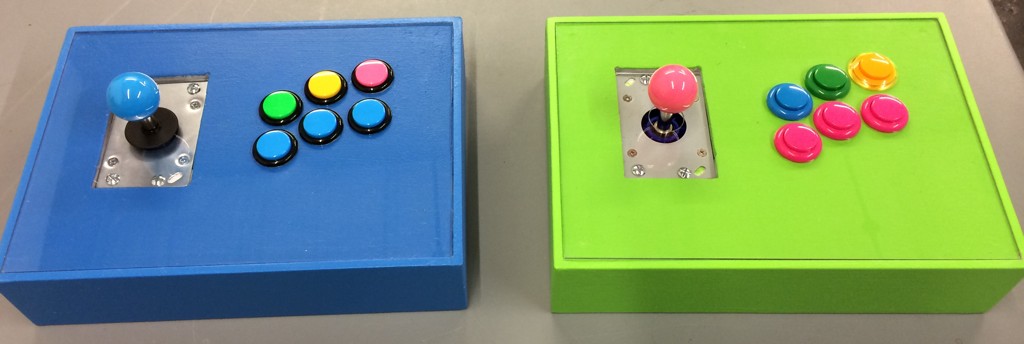
As you can see, the Lexan top-plate and other hardware is installed at this point. This leaves electronics!
For electronics, you’ve got choices. The most straight-forward option is to use an Arduino/microcontroller, and implement a USB HID gamepad. This works well, except that most games on Windows support XBox 360 controllers, which use a different (proprietary?) protocol. So, an alternative is to cannibalise an existing 360 controller. I got some knock-offs, because for some inexplicable reason Microsoft XBox 360 controllers are still really expensive. I wouldn’t recommend this though, the quality varies wildly. It’s hard enough to get them working reliably after you’ve soldered on loads of wires, so you want them to work before.
The controllers are easy enough to strip, however if you desolder any analog elements, i.e. the potentiometers you’ll want to solder in a fixed resistor instead of letting the terminals float. Otherwise, you might get random analog stick movement. The resistor value isn’t critical, as the controllers usually self-calibrate on start-up, but the potentiometers are usually 4.7 kilo-Ohm, so this works well. If in doubt, measure.
Soldering wires to the pad can be difficult, I had to strip away some kind of varnish or solder-mask on one controller to get it to solder on a pad. But since the buttons are all digital, i.e. on/off, it’s incredibly easy to connect them. The crimped connectors are very pretty, but also mechanically robust, I’d recommend them instead of soldering. Mainly because it makes the buttons reconfigurable, and also easy to fix mistakes or breakage. In the picture, you can see the common ground, which is in black:

Update: Somebody has found a way to get the best of both worlds, and use a Teensy to emulate an XInput controller. An XInput controller is slightly different from an XBox 360 controller; the XBox controller has a special chip that authenticates with the console. This is the reason I didn’t even attempt to look into the protocol. Luckily, on PC this is ignored/not implemented. So win-win! This makes wiring so much cheaper and easier, and I’m a big fan of Paul Stoffregen’s Teensy products already. I’d recommend this method.
The final product looks great and works great! It was an incredibly fun build, and really makes playing old games much more fun and “authentic”. Well worth it and highly recommended for all arcade fans, especially if you have no space for an arcade machine build.